
How to Build a Custom PC for Gaming: A Step-by-Step Guide
Table of Contents
Introduction
Building a custom gaming PC can feel like a daunting task, but trust me, it’s an incredibly rewarding experience. Whether you’re a complete beginner or someone looking to upgrade your existing rig, building your own PC is the best way to get exactly what you need — from enhanced performance to a setup that fits your personal preferences. Not only will you have full control over your components, but you’ll also gain a deeper understanding of how your machine works, which can be invaluable for troubleshooting and future upgrades.
In this guide, we’ll walk through everything you need to know — from picking out the right parts to assembling them into your dream machine! Let’s dive into the world of custom PC building and unlock the full potential of your gaming experience.

Why Build a Custom Gaming PC?
Building your own gaming PC comes with several advantages that can elevate your gaming experience and give you more control over your hardware.
Benefits of Building Your Own PC
When you build a custom gaming PC, you’re able to tailor every component to your specific needs and preferences. Unlike pre-built systems, where you’re often stuck with what you’re given, custom builds offer flexibility. You can choose each part based on your gaming style, whether you prioritize high-resolution visuals, fast frame rates, or VR compatibility.
In addition, custom PCs offer better upgradability. You can easily swap out components in the future, ensuring that your system remains top-of-the-line without needing to purchase an entirely new machine. Plus, with more knowledge about your setup, you’re better equipped to troubleshoot and perform maintenance.
Cost vs. Pre-built Systems
One of the biggest reasons many gamers choose to build their own PCs is the cost-effectiveness. While it may seem like a daunting task to pick each component, in most cases, building your own PC can be much more affordable than purchasing a pre-built system. Pre-built systems often include a markup for assembly and software, and you may be paying for components you don’t need. By building your own, you can allocate your budget where it matters most, ensuring you get the best performance per dollar spent.
That said, building a custom PC can require an initial investment of time to research components, and the price can fluctuate based on the parts you select. However, the ability to choose every part means that you can adjust your budget and avoid overspending on features you don’t necessarily need.
The Satisfaction of a Personalized Gaming Setup
Building your own PC isn’t just about saving money or getting better performance—it’s also about creating something that is uniquely yours. The satisfaction of assembling a gaming rig tailored to your exact preferences is unparalleled. Whether it’s choosing a case with the perfect aesthetic or optimizing airflow for better cooling, your custom gaming PC will reflect your style and needs.
Additionally, assembling a PC from scratch is a rewarding process. It’s an opportunity to learn more about how computers work and gain valuable skills for the future. Whether you’re a novice or a seasoned builder, putting together your own machine offers an unmatched sense of accomplishment.

Choosing the Right Components for Your Custom Gaming PC
Building a custom gaming PC can be an exciting project, but choosing the right components is crucial for achieving optimal performance. Here’s a breakdown of the key parts you’ll need to consider:
CPU: The Brain of Your Rig
The central processing unit (CPU) is the heart of your gaming PC, responsible for executing instructions and processing data. When it comes to gaming, you’ll want a CPU that can handle the heavy computational demands of modern games. AMD Ryzen and Intel Core processors are the top contenders for gaming rigs. For high-end gaming performance, look for CPUs with multiple cores (at least 6-8) and a high clock speed (above 3.5 GHz). For an even smoother gaming experience, go for a processor with overclocking capabilities.
GPU: The Heart of Your Gaming Performance
The graphics processing unit (GPU) is arguably the most important part of your gaming PC, as it handles all the graphical rendering for games. When choosing a GPU, you’ll want one that balances power and price based on the games you plan to play. Nvidia’s RTX series and AMD’s Radeon RX series are popular choices. If you’re aiming for 4K gaming or VR experiences, consider investing in higher-end models like the Nvidia RTX 3080 or AMD Radeon RX 6800 XT. The GPU is what will ensure that your games run smoothly at high frame rates with crisp visuals.
RAM and Storage: Speed vs. Size
When it comes to RAM, a good rule of thumb for gaming is to aim for at least 16GB of memory. This provides enough bandwidth for most modern games to run smoothly, while also handling multitasking in the background. If you’re planning to run demanding games or heavy applications simultaneously, consider upgrading to 32GB.
For storage, an SSD (solid-state drive) is highly recommended for its speed. Opt for an SSD with at least 500GB of space for your operating system and frequently played games. For additional storage, a 1TB HDD can offer a more affordable option for bulk storage of less demanding games and files. SSDs significantly improve load times and overall system responsiveness, which is crucial for gaming.
Motherboard, PSU, and Cooling: Connecting Everything Together
The motherboard is where all of your components connect, so choosing one that’s compatible with your CPU and GPU is key. Ensure your motherboard has enough PCIe slots, RAM slots, and USB ports to accommodate all your components. Additionally, make sure it supports future upgrades and has good VRM cooling for stable power delivery.
The power supply unit (PSU) ensures your system gets the necessary power to run. When choosing a PSU, ensure it provides sufficient wattage for all your components. A good rule of thumb is to select a PSU that can handle at least 20% more power than your system’s requirement, typically around 650W to 850W for a solid gaming rig. It’s also important to opt for a PSU with an 80+ Gold rating for better efficiency.
Proper cooling is crucial to prevent your components from overheating. A combination of case fans and a CPU cooler (either air or liquid) will help maintain ideal temperatures. If you’re pushing your system to the limits with overclocking, consider adding an AIO liquid cooler for better thermal management.
You Can Write this : Custom Gaming PCs – Choose & Build your Own Gaming PC
Case: Choosing the Perfect Enclosure
Finally, the PC case is the enclosure that holds all of your components together. A good case will offer sufficient airflow, ample room for your components, and cable management options. Look for a case that supports your GPU’s size, offers enough space for your cooling solution, and has good airflow to keep everything cool. Consider aesthetics too — some cases come with tempered glass panels and RGB lighting for that extra flair. Make sure your case is easy to work with, especially if this is your first build.
Step-by-Step Guide to Assembling Your Custom Gaming PC
1. Preparing Your Workspace
Before you start assembling your custom gaming PC, it’s crucial to prepare a clean, spacious, and well-lit workspace. Here’s what you’ll need to do:
- Find a flat surface: Ensure you have a large, stable table or desk to work on. A clean, uncluttered area is ideal.
- Gather your tools: You’ll need a few basic tools such as a Phillips-head screwdriver, thermal paste (if your cooler doesn’t come with it pre-applied), and anti-static wristbands to avoid damaging sensitive components with static electricity.
- Organize your parts: Lay out all your components (motherboard, CPU, RAM, GPU, power supply, storage, etc.) so they’re easily accessible.
- Prepare anti-static precautions: Ground yourself by wearing an anti-static wrist strap, or periodically touch a metal object to discharge any built-up static.
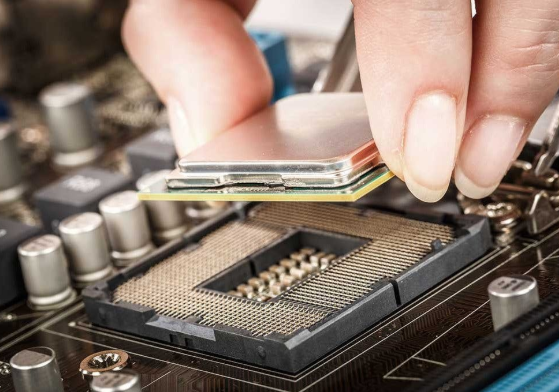
2. Installing the CPU and Cooler
Installing the CPU (Central Processing Unit) and cooler is one of the most delicate steps. Here’s how to do it:
- Open the CPU socket: On your motherboard, find the CPU socket and gently lift the retention arm.
- Install the CPU: Carefully align the CPU with the socket (it will only fit one way) and gently place it into position. Don’t force it—ensure the pins are aligned properly.
- Apply thermal paste: If your cooler doesn’t come with pre-applied thermal paste, apply a small, pea-sized amount in the center of the CPU. This will help transfer heat from the CPU to the cooler.
- Install the cooler: Place the cooler on top of the CPU, aligning it with the mounting holes. Secure it with the screws or clips provided. Tighten them in a crisscross pattern to ensure even pressure on the CPU.
3. Attaching the RAM and Motherboard
Now that your CPU and cooler are in place, it’s time to attach the RAM and install the motherboard into the case.
- Install the RAM: Find the RAM slots on your motherboard. Open the clips on both sides, then line up the notches on your RAM sticks with the slots. Gently press down until the RAM clicks into place.
- Prepare the motherboard: If you haven’t already done so, install the I/O shield in the back of the case. This will help secure the motherboard in place later.
- Install the motherboard into the case: Align the motherboard with the standoffs in the case. Secure it using screws. Ensure that the I/O ports align perfectly with the I/O shield.
4. Wiring Your Components and Cable Management Tips
Once the motherboard, CPU, and RAM are installed, it’s time to connect all the other components and organize the cables.
- Connect the power supply: Install the power supply (PSU) in the designated compartment of the case. Connect the 24-pin ATX power cable to the motherboard and the 8-pin CPU power cable to the CPU socket.
- Attach storage devices: Mount your SSDs or hard drives in their respective bays. For an SSD, use the M.2 slot on the motherboard if available. Otherwise, connect them via SATA cables to the motherboard.
- Install the GPU: Slot your graphics card (GPU) into the PCIe x16 slot on the motherboard and secure it with screws.
- Cable management: To keep your build tidy and improve airflow, use cable ties or Velcro straps to bundle cables. Route cables behind the motherboard tray if possible to avoid clutter in the airflow path. Always try to keep cables out of the way of fans and other cooling components.
By following these steps, you’ll have your custom gaming PC assembled and ready to go!

Tips and Tricks for Optimizing Your Custom Gaming PC
Once you’ve built your custom gaming PC, it’s essential to optimize it to ensure the best performance possible. With the right tweaks and adjustments, you can take your gaming experience to the next level. Below are some tips and tricks for fine-tuning your system.
Overclocking Basics
Overclocking is the process of increasing the clock speed of your CPU and GPU beyond their stock settings to get better performance. By pushing your hardware to its limits, you can achieve higher frame rates, faster load times, and smoother gameplay. However, overclocking comes with some risks, including potential overheating and reduced component lifespan. Here’s how to get started:
- CPU Overclocking: Most modern CPUs have unlocked multipliers, allowing you to tweak their clock speeds easily. To overclock, use tools like Intel’s Extreme Tuning Utility (XTU) or AMD’s Ryzen Master. Gradually increase the multiplier, testing stability with programs like Prime95 or Cinebench.
- GPU Overclocking: For your graphics card, use software like MSI Afterburner or EVGA Precision X1 to adjust the core clock and memory speeds. Always monitor temperatures and stress-test your GPU to avoid thermal throttling.
- Keep Temperatures in Check: Overclocking increases power consumption and heat output, so ensure your cooling solution is up to the task. Invest in high-quality CPU coolers, case fans, or even custom water cooling solutions.
Read More : Best Gaming Laptops for Every Budget in 2025
BIOS Settings and Software Optimizations
Your BIOS (Basic Input/Output System) is the heart of your motherboard, and making the right changes here can unlock more performance for your gaming PC.
- Enable XMP (Extreme Memory Profile): XMP is a memory profile that allows you to run your RAM at its rated speed. Make sure XMP is enabled in the BIOS to get the best performance from your RAM.
- Update Your BIOS: Manufacturers frequently release BIOS updates that improve system stability, compatibility, and performance. Check your motherboard manufacturer’s website regularly for updates.
- Adjust Fan Curves: Customizing your fan curves through the BIOS can help keep your PC cooler while gaming. Set your fans to spin faster when temperatures rise, ensuring your components stay cool during intense gaming sessions.
In addition to BIOS tweaks, make sure to optimize your software:
- Use Game-Boosting Software: Applications like Razer Cortex or MSI Dragon Center help optimize your system by managing background processes and allocating more resources to your games.
- Driver Updates: Keep your drivers, especially for the GPU, up to date. New drivers can provide performance improvements and bug fixes for the latest games.
Maintaining Your PC for Long-Term Performance
Building a custom gaming PC is just the first step; maintaining its performance over time is key to ensuring your system runs smoothly for years.
- Regular Cleaning: Dust buildup inside your PC can restrict airflow and increase temperatures. Use compressed air to clean the inside of your case regularly, especially around the CPU cooler, GPU, and case fans.
- Reapply Thermal Paste: Over time, thermal paste on your CPU and GPU may degrade. Reapplying thermal paste every year or so can help keep temperatures in check, especially after heavy use.
- Monitor System Health: Regularly check your system’s temperature and usage through software like HWMonitor or HWInfo. Keeping an eye on these metrics helps ensure your system isn’t running into thermal throttling or other issues.
- Backup Your Data: While not directly related to performance, having a solid backup plan is essential. Invest in cloud storage or an external hard drive to ensure your valuable gaming data, mods, and save files are safe in case of a hardware failure.
By overclocking carefully, optimizing your BIOS and software, and maintaining your system regularly, you can ensure your custom gaming PC runs at its best for years to come.

Troubleshooting Common PC Building Mistakes
Building your own custom gaming PC is an exciting and rewarding experience, but sometimes things don’t go as planned. From power issues to hardware compatibility problems, knowing how to troubleshoot these common mistakes can save you time and frustration. Below are some key troubleshooting tips to help you resolve typical issues you may encounter during your PC build.
Power Issues and Troubleshooting the PSU
One of the first signs that something’s wrong with your custom PC build is when it fails to power on. Before panicking, check the power supply unit (PSU). Here’s what you should check:
- Ensure Proper Connections: Make sure all cables are properly connected to the PSU, motherboard, and components. The 24-pin ATX connector and 8-pin CPU connector are essential for powering the motherboard. Don’t forget to plug in the power cables to the GPU, if necessary.
- Check the PSU Switch: Many PSUs have an on/off switch located at the back. If it’s in the off position, the PC won’t receive power. Flip the switch to the “on” position and try again.
- Test with a Paperclip: If you’re still unsure if the PSU is working, you can perform the “paperclip test.” This involves using a paperclip to jump the green wire (PS_ON) and any black wire (COM) on the 24-pin connector. If the PSU fan doesn’t spin when powered on, it’s time for a replacement.
- Check Wattage and Power Draw: Ensure your PSU has enough wattage to support all your components, especially your GPU and CPU. Tools like PCPartPicker can help estimate the power requirements of your build.
Hardware Incompatibility
Sometimes, despite careful planning, hardware compatibility issues may arise. Here are a few common problems and how to fix them:
- Motherboard and CPU Compatibility: Ensure that the CPU socket on your motherboard matches the CPU you intend to use. Also, double-check the motherboard’s chipset to ensure it supports your chosen processor. Refer to the motherboard’s manual or website for a list of supported CPUs.
- RAM Clearance: Some large air coolers or tall RAM modules might interfere with the installation of your RAM slots or cause conflicts with the CPU cooler. If you encounter this issue, consider using low-profile RAM or adjusting the placement of your cooler.
- PCIe Slot Compatibility: Ensure that your GPU fits properly into the PCIe slot on your motherboard. Some older motherboards may not have enough space for larger graphics cards, or the slot may be limited to PCIe 2.0 instead of the more modern PCIe 3.0/4.0 standards.
- Power Connectors: Always verify that your power cables (e.g., 8-pin or 6-pin PCIe connectors) are compatible with your GPU and other components. A failure to connect the correct cables can prevent the system from powering on or cause instability during gaming.
Tips for Handling Startup Problems
If your gaming PC is powered on but fails to start properly, here are some things to check:
- Double-Check Cable Connections: Verify that all power and data cables (SATA, 24-pin, etc.) are securely connected. Loose cables are one of the most common causes of startup problems.
- BIOS/UEFI Settings: After building your PC, it’s essential to update your BIOS/UEFI to ensure compatibility with newer hardware. If the system is not starting, enter the BIOS settings (usually by pressing the “DEL” or “F2” key during boot) and reset to default settings to resolve potential configuration issues.
- Check for Beep Codes or LEDs: Most motherboards have built-in diagnostic LEDs or emit beep codes when hardware issues are detected. Refer to your motherboard’s manual for an explanation of these codes. This can give you clues about what’s causing the issue (e.g., RAM, CPU, or GPU).
- Try Booting Without Extra Hardware: If you’re still encountering startup issues, disconnect non-essential hardware such as additional storage drives or USB devices. This helps identify if a specific piece of hardware is preventing the PC from booting.
- Test RAM and CPU: If your PC fails to boot, try reseating your RAM or switching the RAM slots. It’s also worth checking your CPU to ensure it’s correctly seated in its socket. Improper seating can lead to boot failure or intermittent problems.
By troubleshooting common mistakes during the PC building process, you can quickly identify and resolve issues, ensuring your custom gaming rig is up and running smoothly!
Conclusion
Building a custom gaming PC is an exciting project that gives you full control over your gaming experience. Whether you want the latest graphics for AAA titles or need a budget-friendly option for esports, there’s a custom PC build that fits your needs. Remember to take your time, stay patient, and enjoy the process. The joy of assembling each component and seeing everything come to life is a rewarding experience. Once your rig is up and running, you’ll have a machine that’s tailored specifically to your gaming needs. Feel free to share your build in the comments — I’d love to hear about the epic rig you’re putting together!
- How to Improve Battery Life on Your Laptop
 How to Improve Battery Life on Your Laptop (Real Tips That Actually Work!) Introduction “My battery died in the middle of a Zoom interview. I wanted to cry.” We’ve all …
 - Google Pixel 9a vs iPhone 16e: The Ultimate $500 Mid-Range Battle
 Google Pixel 9a vs iPhone 16e: The Ultimate $500 Mid-Range Battle Introduction In 2025, the smartphone mid-range battlefield just got a lot more exciting with the release of two contenders …
 - Oppo Find X8 Ultra: My 2025 Dream Phone Brought to Life
 Oppo Find X8 Ultra: My 2025 Dream Phone Brought to Life Introduction All right, let’s get real—I’ve been asked countless times over the years, “What’s your dream phone?” And usually, …
 - Acer Aspire Go 15 (AG15-51P) Review
 Acer Aspire Go 15 (AG15-51P) Review: Budget-Friendly Performance Unveiled Introduction Did you know that budget laptops now offer features once reserved for premium models? The Acer Aspire Go 15 (AG15-51P) …
 - US-Based iPhone Manufacturing: Is Apple Really Bringing iPhone Production Home?
 US-Based iPhone Manufacturing: Is Apple Really Bringing iPhone Production Home? 2025 Introduction “Did you know over 90% of iPhones are still made in China, even in 2025?”Yep, it’s true—and kind …


